Connect an External Assistant
Developer settings let you connect external AI assistants such as Codex, Claude, Cursor, Windsurf, VS Code, Gemini CLI, and other MCP-compatible clients to your TheoryCraft account.
Last updated: June 26, 2026
Use this guide when you prefer working from an external assistant instead of the in-app AI Assistant.
Before You Start
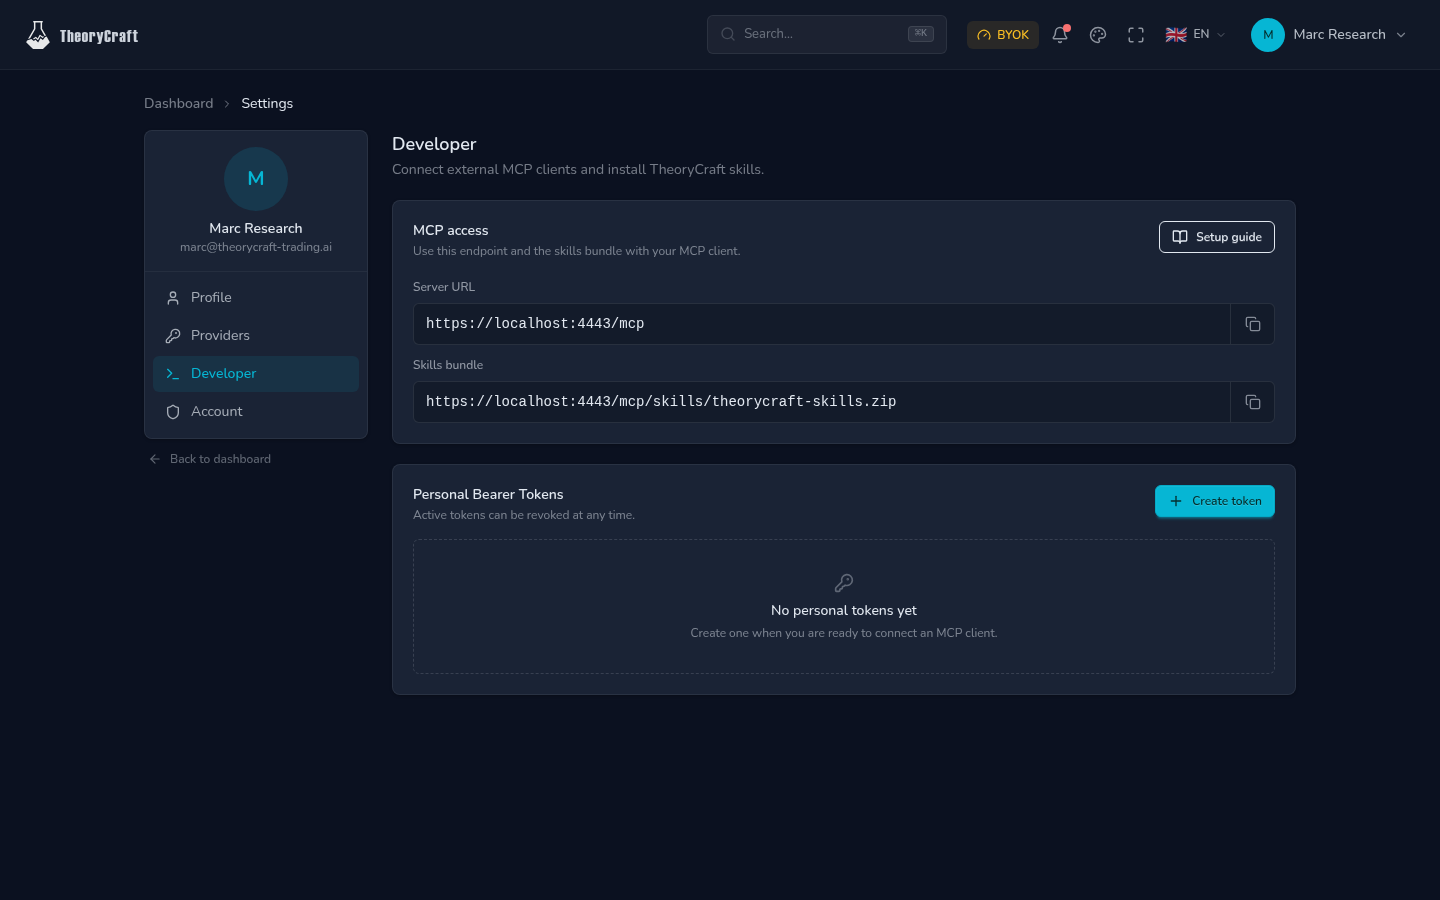
Open Developer settings, then copy the MCP endpoint shown there. The examples below use:
https://theorycraft-trading.ai/mcp
If your settings page shows a different endpoint, use the endpoint from your own account.
Keep TheoryCraft open while you test the connection so you can verify that the assistant can access the platform actions you allow.
Choose Access
TheoryCraft supports two connection methods:
| Method | Best for |
|---|---|
| Sign in with TheoryCraft | Clients that open a browser login flow, such as Claude.ai connectors or Codex OAuth login. |
| Personal token | Clients that ask you to paste a token or read one from an environment variable. |
When creating a personal token, choose the smallest access level that fits your use:
| Access | Allows |
|---|---|
| Read only | The assistant can read allowed information from your TheoryCraft account. |
| Read/write | The assistant can also perform supported actions in TheoryCraft when you ask it to. |
Quick Install Prompt
Paste this prompt into the assistant you want to connect. It lets the assistant configure the MCP server and install the TheoryCraft skills bundle for you when the client supports those operations.
Set up TheoryCraft for this assistant.

1. Add a remote MCP server named "theorycraft" using this endpoint:
   https://theorycraft-trading.ai/mcp
2. Prefer browser sign-in or OAuth if this client supports it.
3. If the client asks for scopes, request mcp:read. Request mcp:write only if I want this assistant to perform actions in TheoryCraft.
4. If browser sign-in is not supported, ask me to create a TheoryCraft personal token from Developer settings, store it as a local secret or environment variable, and configure the MCP server to use it.
5. Install the TheoryCraft skills bundle from:
   https://theorycraft-trading.ai/mcp/skills/theorycraft-skills.zip
   Extract it into this assistant's local skills directory if local skills are supported.
6. Restart or reload this assistant if needed.
7. Verify that the TheoryCraft tools and skills are available, then tell me what was configured.
Install TheoryCraft Skills Manually
Install the TheoryCraft skills bundle so your assistant understands TheoryCraft workflows and terminology. Install it once for each client or machine where you use the assistant.
Bundle URL:
https://theorycraft-trading.ai/mcp/skills/theorycraft-skills.zip
Codex
macOS and Linux:
mkdir -p "${CODEX_HOME:-$HOME/.codex}/skills"
curl -fsSL https://theorycraft-trading.ai/mcp/skills/theorycraft-skills.zip -o /tmp/tc-skills.zip
unzip -o /tmp/tc-skills.zip -d "${CODEX_HOME:-$HOME/.codex}/skills"
rm -f /tmp/tc-skills.zip
Windows PowerShell:
$dest = "$env:USERPROFILE\.codex\skills"
New-Item -ItemType Directory -Force $dest
Invoke-WebRequest "https://theorycraft-trading.ai/mcp/skills/theorycraft-skills.zip" -OutFile "$env:TEMP\tc-skills.zip"
Expand-Archive -Force "$env:TEMP\tc-skills.zip" $dest
Remove-Item -Force "$env:TEMP\tc-skills.zip"
Claude Code
Claude Code supports personal skills in ~/.claude/skills and project skills in .claude/skills. Use personal skills when you want TheoryCraft available in every project.
macOS and Linux:
mkdir -p "$HOME/.claude/skills"
curl -fsSL https://theorycraft-trading.ai/mcp/skills/theorycraft-skills.zip -o /tmp/tc-skills.zip
unzip -o /tmp/tc-skills.zip -d "$HOME/.claude/skills"
rm -f /tmp/tc-skills.zip
Windows PowerShell:
$dest = "$env:USERPROFILE\.claude\skills"
New-Item -ItemType Directory -Force $dest
Invoke-WebRequest "https://theorycraft-trading.ai/mcp/skills/theorycraft-skills.zip" -OutFile "$env:TEMP\tc-skills.zip"
Expand-Archive -Force "$env:TEMP\tc-skills.zip" $dest
Remove-Item -Force "$env:TEMP\tc-skills.zip"
For project-scoped skills, extract the ZIP into .claude/skills in the project root instead. If Claude Code was already running and the skills directory did not exist yet, restart Claude Code; otherwise it detects changes automatically.
Reference: Claude Code skills.
Claude.ai Skills
Claude.ai manages skills from the Claude settings UI. The TheoryCraft bundle contains multiple skill folders, while Claude.ai uploads expect one skill folder per ZIP. To use the same skills there, download the bundle, extract it, create a separate ZIP for each theorycraft-* folder, then upload those ZIPs from Claude's Skills settings.
If you only need Claude.ai to call TheoryCraft tools, skip the skill upload and use the Claude.ai connector setup below.
Reference: Claude.ai custom skills.
Gemini CLI
Gemini CLI supports Agent Skills in ~/.gemini/skills for user-wide use and .gemini/skills for project-local use.
macOS and Linux:
mkdir -p "$HOME/.gemini/skills"
curl -fsSL https://theorycraft-trading.ai/mcp/skills/theorycraft-skills.zip -o /tmp/tc-skills.zip
unzip -o /tmp/tc-skills.zip -d "$HOME/.gemini/skills"
rm -f /tmp/tc-skills.zip
gemini skills list
Windows PowerShell:
$dest = "$env:USERPROFILE\.gemini\skills"
New-Item -ItemType Directory -Force $dest
Invoke-WebRequest "https://theorycraft-trading.ai/mcp/skills/theorycraft-skills.zip" -OutFile "$env:TEMP\tc-skills.zip"
Expand-Archive -Force "$env:TEMP\tc-skills.zip" $dest
Remove-Item -Force "$env:TEMP\tc-skills.zip"
gemini skills list
Inside an active Gemini CLI session, run /skills reload after installing or updating the bundle.
Reference: Gemini CLI skills commands.
Cursor, Windsurf, VS Code, Continue, and Other Clients
Not every MCP client has a local SKILL.md system. Cursor, Windsurf, VS Code, and Continue primarily document MCP server configuration, so connect them to the TheoryCraft MCP endpoint and let the tool descriptions guide the assistant. If your client later adds first-class SKILL.md support, extract the ZIP into that client's documented skills directory.
Connect Your Client Manually
Codex
Codex with Browser Sign-In
export TC_MCP_URL="https://theorycraft-trading.ai/mcp"
codex mcp add theorycraft --url "$TC_MCP_URL" --oauth-resource "$TC_MCP_URL"
codex mcp login theorycraft --scopes mcp:read,mcp:write
Codex with a Personal Token
Create a personal token in Developer settings, then store it in an environment variable.
macOS and Linux:
export TC_MCP_URL="https://theorycraft-trading.ai/mcp"
export THEORYCRAFT_MCP_TOKEN="paste-your-token"
codex mcp add theorycraft --url "$TC_MCP_URL" --bearer-token-env-var THEORYCRAFT_MCP_TOKEN
Windows PowerShell:
$env:TC_MCP_URL = "https://theorycraft-trading.ai/mcp"
setx THEORYCRAFT_MCP_TOKEN "paste-your-token"
codex mcp add theorycraft --url $env:TC_MCP_URL --bearer-token-env-var THEORYCRAFT_MCP_TOKEN
Restart the terminal after setx so the new environment variable is available.
Claude Code
Claude Code with Browser Sign-In
Add the remote HTTP MCP server, then run /mcp inside Claude Code to complete the browser login flow.
export TC_MCP_URL="https://theorycraft-trading.ai/mcp"
claude mcp add --transport http --scope user theorycraft "$TC_MCP_URL"
claude
In Claude Code:
/mcp
Claude Code with a Personal Token
Create a personal token in Developer settings, then pass it as an HTTP authorization header.
export THEORYCRAFT_MCP_TOKEN="paste-your-token"
claude mcp add --transport http --scope user \
  --header "Authorization: Bearer $THEORYCRAFT_MCP_TOKEN" \
  theorycraft "https://theorycraft-trading.ai/mcp"
Gemini CLI
Gemini CLI with Browser Sign-In
Add TheoryCraft as a user-scoped HTTP MCP server. Gemini CLI opens the browser authentication flow when the server asks for OAuth.
export TC_MCP_URL="https://theorycraft-trading.ai/mcp"
gemini mcp add --transport http --scope user theorycraft "$TC_MCP_URL"
gemini mcp list
Gemini CLI with a Personal Token
Create a personal token in Developer settings, then pass it as an HTTP authorization header.
export TC_MCP_URL="https://theorycraft-trading.ai/mcp"
export THEORYCRAFT_MCP_TOKEN="paste-your-token"
gemini mcp add --transport http --scope user \
  --header "Authorization: Bearer $THEORYCRAFT_MCP_TOKEN" \
  theorycraft "$TC_MCP_URL"
Claude.ai Connector
Create a custom connector and choose browser sign-in.
Use these values when Claude asks for them:
MCP server URL: <the MCP endpoint shown in Developer settings>
Resource URL: <the same MCP endpoint>
Permissions: read/write if you want Claude to perform actions in TheoryCraft, otherwise read only
Cursor
Add TheoryCraft to .cursor/mcp.json for a project, or to your user MCP configuration if you want it available everywhere.
{
  "mcpServers": {
    "theorycraft": {
      "type": "http",
      "url": "https://theorycraft-trading.ai/mcp",
      "headers": {
        "Authorization": "Bearer ${env:THEORYCRAFT_MCP_TOKEN}"
      }
    }
  }
}
Reference: Cursor MCP configuration.
Windsurf
Open Windsurf's Cascade MCP raw config and add a remote HTTP server. Windsurf uses serverUrl for remote HTTP MCP entries.
{
  "mcpServers": {
    "theorycraft": {
      "serverUrl": "https://theorycraft-trading.ai/mcp",
      "headers": {
        "Authorization": "Bearer ${env:THEORYCRAFT_MCP_TOKEN}"
      }
    }
  }
}
Reference: Windsurf Cascade MCP.
VS Code
Use the command palette entry MCP: Open User Configuration or create .vscode/mcp.json in a workspace. VS Code uses a top-level servers object, not mcpServers.
{
  "inputs": [
    {
      "type": "promptString",
      "id": "theorycraft-token",
      "description": "TheoryCraft MCP token",
      "password": true
    }
  ],
  "servers": {
    "theorycraft": {
      "type": "http",
      "url": "https://theorycraft-trading.ai/mcp",
      "headers": {
        "Authorization": "Bearer ${input:theorycraft-token}"
      }
    }
  }
}
Reference: VS Code MCP configuration.
Continue and Other JSON MCP Clients
Use the remote MCP or HTTP MCP setup supported by your client. The labels vary by product, but the values are:
Name: theorycraft
URL: <the MCP endpoint shown in Developer settings>
Sign-in method: browser sign-in, or personal token
Resource URL, if asked: <the same MCP endpoint>
If your client asks for a JSON configuration and supports environment variables, use:
{
  "mcpServers": {
    "theorycraft": {
      "type": "http",
      "url": "https://theorycraft-trading.ai/mcp",
      "headers": {
        "Authorization": "Bearer ${THEORYCRAFT_MCP_TOKEN}"
      }
    }
  }
}
For browser sign-in, leave out the headers block and use the sign-in fields shown by your client.
What External Assistants Can Help With
External assistants can inspect and manage supported TheoryCraft context based on the access you grant. Good tasks include:
- Finding or opening explorations.
- Reviewing notebooks and files.
- Creating or updating supported workspace content.
- Managing exploration tags.
- Checking current dashboard context.
They should not receive secrets in prompts or notebooks. Treat external assistant output the same way you treat in-app assistant output: review changes before relying on them.
Keep Access Safe
- Create a separate token for each client.
- Prefer read-only access unless you want the assistant to perform actions in TheoryCraft.
- Add an expiration date for temporary devices.
- Revoke unused tokens from Developer settings.
- Never paste a personal token into a shared repository, issue, chat transcript, or prompt library.
FAQ
Do I need both MCP and skills?
MCP connects the assistant to TheoryCraft tools. Skills teach the assistant TheoryCraft workflows and vocabulary. Use both when your client supports local skills. If it does not, MCP alone still works.
Should I use browser sign-in or a personal token?
Use browser sign-in when the client supports it. Use a personal token when the client asks for a token, header, or environment variable.
Which access level should I choose?
Use read-only access when the assistant only needs to inspect context. Use read/write only when you want it to perform supported actions in TheoryCraft.
Can an external assistant trade for me?
No. External assistants can help with research and supported platform actions. Trading decisions and any real execution remain your responsibility.
Can I connect several assistants?
Yes. Create a separate token for each assistant or device so you can revoke one connection without affecting the others.
Why do TheoryCraft tools not appear in my assistant?
Refresh or restart the client, confirm the MCP endpoint, then check whether the sign-in session or token is still valid. If skills are missing, reload the client's skills list after installing the bundle.
Troubleshooting
| Symptom | What to check |
|---|---|
| Client cannot connect | Confirm the endpoint and network access. |
| Sign-in fails | Retry from Developer settings or use a personal token. |
| Tool list is empty | Refresh the client connection and check access level. |
| Write action is rejected | Confirm the token or sign-in session has read/write access. |
| Skills are not detected | Restart the assistant or reload its skills list. |